
Welcartのテンプレートでの簡単なフッターにウィジェットの設置の手順を説明いたします。

基本的にコピペして下さい。
1,まずはfunctions.phpに追加
テーマごとに書き方は違いと思いますが、サイドバーがあるテーマでしたらテーマ編集よりfunctions.phpに(* widgetの下あたりにでも)
/***********************************************************
* footer widget
***********************************************************/
register_sidebar(array(
‘name’ => ‘footerleft’,
‘description’ => ‘footerleft’,
‘before_widget’ => “\n\t\t\t” . ‘<li id=”%1$s” class=”widget %2$s”><div class=”widgetblock”>’,
‘after_widget’ => “\n\t\t\t</div></li>\n”,
‘before_title’ => “\n\t\t\t\t”. ‘<div class=”widgettitleb”><h3 class=”widgettitle”>’,
‘after_title’ => “</h3></div>\n” .”
));
register_sidebar(array(
‘name’ => ‘footercenter’,
‘description’ => ‘footercenter’,
‘before_widget’ => “\n\t\t\t” . ‘<li id=”%1$s” class=”widget %2$s”><div class=”widgetblock”>’,
‘after_widget’ => “\n\t\t\t</div></li>\n”,
‘before_title’ => “\n\t\t\t\t”. ‘<div class=”widgettitleb”><h3 class=”widgettitle”>’,
‘after_title’ => “</h3></div>\n” .”
));
register_sidebar(array(
‘name’ => ‘footercenter2’,
‘description’ => ‘footercenter2’,
‘before_widget’ => “\n\t\t\t” . ‘<li id=”%1$s” class=”widget %2$s”><div class=”widgetblock”>’,
‘after_widget’ => “\n\t\t\t</div></li>\n”,
‘before_title’ => “\n\t\t\t\t”. ‘<div class=”widgettitleb”><h3 class=”widgettitle”>’,
‘after_title’ => “</h3></div>\n” .”
));
register_sidebar(array(
‘name’ => ‘footerright’,
‘description’ => ‘footerright’,
‘before_widget’ => “\n\t\t\t” . ‘<li id=”%1$s” class=”widget %2$s”><div class=”widgetblock”>’,
‘after_widget’ => “\n\t\t\t</div></li>\n”,
‘before_title’ => “\n\t\t\t\t”. ‘<div class=”widgettitleb”><h3 class=”widgettitle”>’,
‘after_title’ => “</h3></div>\n” .”
));
をコピペして下さい。
2、ウィジェットを確認。
【外観】→【ウィジェット】を確認
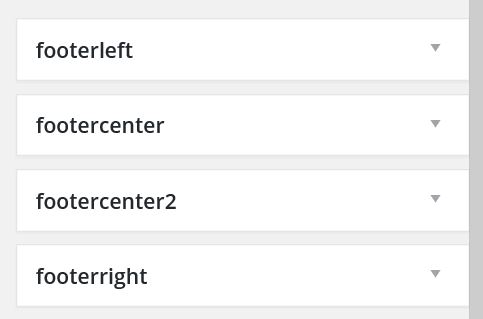
先程、functions.phpで追加した部分が表示されています。
しかし、ここに追加してもまだサイトの方には表示されません。
3,footer.phpに追加
テーマ編集よりfooter.phpに下記を追加
(<?php endif; ?> ~ <p class=”copyright”><?php usces_copyright(); ?></p>の間に追加して下さい:仕様によって別の所でも構いませんが・・・)
<div id=”footer-widget” class=”clearfloat”>
<div id=”footerleft” class=”clearfloat”>
<?php if(function_exists(‘dynamic_sidebar’) ) dynamic_sidebar(footerleft);?>
</div>
<div id=”footercenter” class=”clearfloat”>
<?php if(function_exists(‘dynamic_sidebar’) ) dynamic_sidebar(footercenter);?>
</div>
<div id=”footercenter2″ class=”clearfloat”>
<?php if(function_exists(‘dynamic_sidebar’) ) dynamic_sidebar(footercenter2);?>
</div>
<div id=”footerright” class=”clearfloat”>
<?php if(function_exists(‘dynamic_sidebar’) ) dynamic_sidebar(footerright);?>
</div>
</div>
これでフッターにウィジェットが追加できるようになります。
4,最後にスタイルシートに下記のコードをコピペして完了。
div#footerleft{
width:26.4%;
float:left;
}
div#footercenter {
width:26.4%;
float:left;
}
div#footercenter2 {
width:26.4%;
float:left;
}
div#footerleft {
padding:10px 5px 10px 10px;
}
div#footercenter {
padding:10px 5px 10px 5px;
}
div#footercenter2 {
padding:10px 5px 10px 5px;
}
div#footerright {
width:15%;
float:right;
padding:10px 10px 10px 5px;
}
.clearfloat {
margin : 0px;
padding : 0px;
width : 892px;
}
.clearfloat:after {
visibility: hidden;
display: block;
font-size: 0;
content: ” “;
clear: both;
height: 0;
}
/*********************************************************************/
フッターでウィジェットが使えれば、色々幅が広がりますね。
コードの使用によりサイトが崩れたなどの保証はできませんので、コードの書き換え時は、しっかりバックアップを取って作業をして下さい。
微調整に関しては、cssを調整して下さい。